We live in a time where almost every bit of our everyday life has been digitized, and therefore we store a lot of relevant information on our computers or mobile devices. From social media and email passwords, to highly-sensitive info, such as banking records and social security number.
With the increasing number of scammers and hackers looming around every corner of the internet, protecting your data is more necessary than it ever was. If it falls into the wrong hands, the repercussions can be devastating, and it can never be taken back.
With that in mind, we are here to provide you with a few simple solutions to help you to strongly encrypt your data; both on your computer and mobile device.
PC, Mac, Linux
Based on our research, the best and easiest way to confidently protect your files on your computer is a program called BestCrypt, a paid app, but with a comfortable trial period. We also have a completely free and open-source option with Veracrypt below. Veracrypt is not as nice to use, but it’s hard to complain when it’s free.
In a nutshell, what BestCrypt does is that it allows users to create a virtual drive where they can store any file they want to. The user defines the storage size of the drive before creating it.
Both the installation process and using the program qualify as relatively simple procedures. Just follow the step-by-step screenshots and you will be good to go.
Download and install BestCrypt
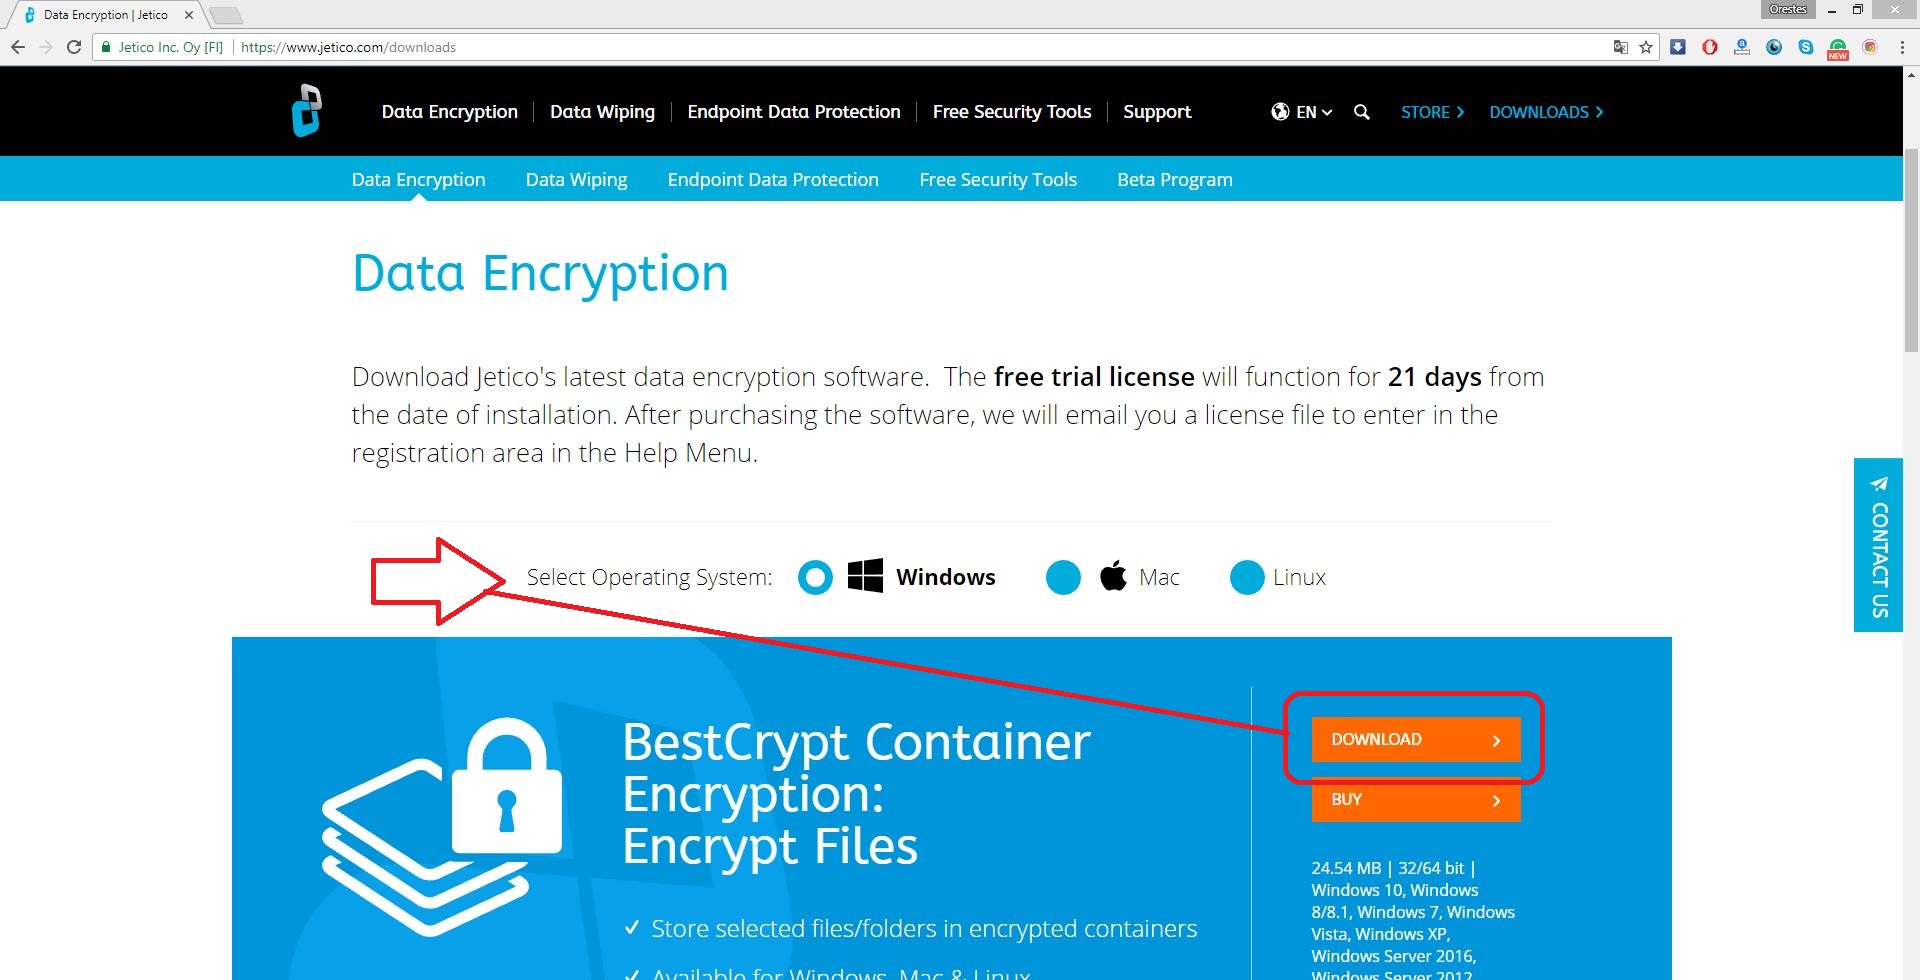
To download BestCrypt, head over to jetico.com/downloads, select your operating system and then click download.
Once the download is finished, click on the .exe file, located in the bottom left-hand corner (Chrome). Alternatively, you can press CTRL+J to see the list of recent downloads in the browser.

Hit next on every page of the installation menu. Once the process is completed, you will be asked to restart your computer. Click yes.

Using BestCrypt
Now that everything is all set up, search on your computer for “BestCrypt Control Panel” and open it. To create a new virtual drive, click the button circled in the screenshot below.

The program will then ask you to set up the size of the virtual drive. Once you’ve decided, hit create. Time of creations depends on the size you’ve selected.

You will then be asked to set up a password for the particular container. Make sure that you’ve written it down. If the user forgets the password, he will not be able to restore it. We have an article that explains how to create strong passwords that are easy to remember.

The program will ask you to randomly press keys on your keyboard, thus generating a hyper-safe encryption key that is almost impossible to break. Only a quantum computer would be able to find the key in a reasonable time frame. In theory, an attack on a single AES-256 key (a common encryption protocol) can take billions of years every single computer on the planet, today.

You now have a password-protected virtual drive. Copy all the files you wish to keep private into it, just like you would on a USB drive.

Once you are ready to virtually ejecting the encrypted drive, select the container and click the yellow button, or right click on the container and select “Dismount” from the contextual menu.

When you wish to re-access the protected files, open BestCrypt, select the respective container and click the green button circled below, or right click on the container and select “Mount” from the contextual menu (it’s like virtually inserting the encrypted drive in the system). Enter the container’s password and the virtual drive will automatically open and will be accessible as long as you do not dismount it.

To change or remove the password from a container the user will first have to dismount it, then right-click on it and select properties from the contextual menu that shows up. Hit “User Passwords” and then select one of the two. Either way, you will be initially asked to type in your old password, for security purposes.

It is worth mentioning that BestCrypt has a three-week free trial. After that, the containers will be accessible in read-only mode. For personal use or for small businesses, the full version costs $80 per year, or $7 a month.
We know that $80 might sound a lot, though BestCrypt really is the best data encryption program currently available. If you genuinely value the privacy of your data, we’d strongly suggest that you look no further.
VeraCrypt
The folks who are currently on a tighter-budget could go with VeraCrypt, which is free of charge. VeraCrypt functions the same way as BestCrypt, though the former is much less user-friendly.
Download and install VeraCrypt
To download VeraCrypt, head over to Codeplex.com and select the operating system of your choice. Then click on the .exe file, located in the bottom left-hand corner (Chrome). Alternatively, you can press CTRL+J to see the list of recent downloads in the browser.


The installation window will then show up. Click next on every page of the process.

Using VeraCrypt
Much like on BestCrypt, we are going to create an encrypted virtual drive on VeraCrypt as well.
Open up VeraCrypt, and then follow Creat Volume>Create an encrypted file container>Standard VeraCrypt Volume.

Next up, you will have to specify where you would like to save the VeraCrypt file.

Adjust the file’s space based on the size of the files you are planning to store into it. Following that, you will be asked to set up a password and then to randomly press keys on the keyboard, thus generating an encryption key. It goes without saying that you should write down that password.
The VeraCrypt file has been created. Do also keep the type of Hash Algorithm that you are using, as it will be needed down the road.

To mount the encrypted file, you will have to pick one of the virtual drives that VeraCrypt offers. Pick any of them, click select file and then open the VeraCrypt file – as illustrated below.

Once that’s done, click Mount. You will then be asked to fill in the password that you setup a few steps above. In case you had written down the type of Hash Algorithm, select it from the “PKCS-5 PRF” menu, as it will expedite the mounting process. If you haven’t, just leave it on Autodetection.
You have successfully mounted the container as a virtual disk M:.

To “lock” the virtual drive, just click Dismount. When you wish to re-access its content, select the drive and click Mount. Type-in your password and you will be good to go.

For more details, you can also check out this VeraCrypt tutorial.
Encrypt individual files: Windows, Mac, Linux, Android, and iOS
Download and install AESCrypt
To download AESCrypt, head over to aescrypt.com/download/ and select the operating system of your choice. To avoid using the command prompt to operate AESCrypt, pick the GUI version. The program is free of charge.

Open the .zip file and follow the instructions described in the picture below.

Using AESCrypt
Using the program is a piece of cake. Just right-click on the individual file you wish to encrypt, hit AES Encrypt and then setup the password.
Much like BestCrypt there is no password restoration process available, so do ensure that you’ve written down the password.

Once that is complete, delete the non-encrypted version, since the program will generate an encrypted one.

To open the file, just double-click on the encrypted version and enter the respective password. The file will automatically open, while the non-encrypted version will be revived as well.


We strongly recommend using AESCrypt for quick and simple individual-file encryption.
Android and iOS
The best way to password-proof your files on iOS and Android is by downloading a folder locker-kind of app. There are plenty of options on both operating systems, most of which are free, though they do ask for a few extra bucks in order to get the full features-package.
Folder Lock (Android 4.0+, iOS 7.0+)
Folder Lock is one of the most popular apps in this category and is available on both Android and iOS. Of all the apps that we tested, we recommend Folder Lock chiefly due to the wide range of types of data that it covers.
More specifically, with Folder Lock you can hide:
- Photos and videos, Galleries
- Documents
- Apps
- Audio
- Notes
- Contacts
- Miscellaneous files (they contain system file data or data from the apps installed on your phone)
To kick things off, download Folder Lock from Play Store or App Store. When you first launch it, you will be asked to set up your PIN. The user can change his password from the app’s settings.
In fact, you can also use a pattern/password lock, or even fingerprint-lock. In the latter case, your device must come with a fingerprint sensor.

The pro version costs about $5 (one-time-payment). It removes ads, offers 24/7 support and most importantly features cloud backup. For those unfamiliar, with cloud backup the user has access to all his hidden data – within the app – from any device that he downloads the app on.

As aforementioned, besides conventional data, Folder Lock also allows you to hide apps. To do so, tap on the AppLock button from the main menu and hit the lock on the apps you want to hide from public view. From now on, the particular apps will be accessible only via the Locked Apps section within AppLock.
A similar procedure applies to the rest types of data.

You can also view if there have been any attempts at entering the app and which people were behind it. Every time the password/PIN/pattern is typed incorrectly, the app registers it as hacking attempt and simultaneously uses the front camera to snap a photo of the intruder – silently.

Pros:
- The app covers almost everything
- Lots of cool extra features
- Pro version is sensibly priced
Cons:
- Way too many annoying ads on the free version
If you encounter any problems while trying out any of the above or have a recommendation to make, feel free to shoot a comment down below.
Filed in . Read more about Android, Encryption, iOS, Linux, Mac (Apple) and Windows.
